Bo’s Gun Shop
Elizabeth City, NC
Bo’s Gun Shop
Elizabeth City, NC
As Presented

In Progress

Finished Work

This is a Winchester 94 that was created in 1954. The owner is a gun collector and enthusiast who decided he wanted this rifle restored to a “like issued” condition. There was heavy deep pitting on both sides of the receiver as well as uneven surface rust throughout. Additionally, someone had beat the heck out of the front sight, malforming it. Further, the cartridge guide screws were rusted in-place and required drilling out and reaping from outside the receiver. As you can see, the stock was heavily worn and discolored. After literally hours of sanding and polishing the parts to remove rust and pits, I blued the parts that are normally blued and polished the parts that are not. It turned out the butt stock was cracked in two places and someone had added a sling swivel to the butt stock the owner wanted removed. I plugged the sling swivel hole and repaired the cracks, stripped the stock and forearm, then refinished them with a light-red traditional walnut stain. The rifle came out beautifully and increased it’s value by at least as much as the owner paid for the restoration. Looks like it just came off the factory floor in 1954.

These are pictures of an old S&W Model 15 that I purchased years ago as a bucket of rust. Originally I’d cold-blued it, but after setting up my caustic blueing rig I decided to “test” the system using this firearm. What do you think? After removing all the cold blueing and polishing the surfaces to a matte finish “in the white,” I caustic blued it, and I think it came out awesome! My charges for blueing can be found on my “prices” page and don’t include disassembly, removing the blueing, and prepping the metal to in-the-white as every firearm uniquely presents individual challenges to prepping. Plus, you have to decide how much polishing you want/need done, from matte to bright mirror final finish. This one is a satin finish.

This is a Ruger Blackhawk single-action revolver. The gentleman older who owns it wanted a larger and lower hammer spur making it easier to reach the hammer to cock, so I modified a stock Ruger Bisley hammer made for a New Vaquero that can come stock with a Bisley grip frame and hammer to fit this Blackhawk, another two and a Vaquero with standard grip frame. Stock the Bisley hammers will only fit a New Vaquero Bisley grip frame. Came out great, and the gentleman was very happy with the results too so much so he had me do the same to all his Ruger single actions. How about yours? Think you might like the same? Labor was a little over $100, and then there is the cost of the replacement hammer, which is about $40.00. Give me a call and let’s see about doing yours up too!

Old S&W Model 10 Police Revolver a good customer brought in. It’s as presented condition was a bit rough. The cylinder and frame exhibited deep pitting and rust in several locations that were too deep to polish out for rebluing. My customer had me two-tone cerakote it in Patriot Brown and Armorer’s Black. You’d never know the surface wasn’t pristine after cerakoting! Looks great with a hard-as-nails coating that will last and last! My customer also replaced the grip panels with these beautiful and very functional grips. Have an old firearm that wouldn’t be suitable for rebluing but you want to look like a million bucks? Bring er’ in and let’s work up a finish!
AR-15 in 300 AAC Blackout I built for myself
1911 I built for myself. I nickel plated the frame, installed oversized mag release, slide release, and safety, and reduced the overtravel to zero, took out all trigger creep, and set the trigger pull to around 3 lbs. Smooth, slick, pretty, and powerful. One of my favorites.
Here is an old Mossberg “Maverick” I modded to be the ultimate home defense shotgun. I shortened the barrel (still legal), replaced the stock, installed a barrel heat shield (to protect my hand from barrel heat), and of course, installed all those spare round holders!
Same Mossberg showing the stock folded over - still legal length, but lethal and so easy to swing in close quarters!
Yep - full-sized AR-10 I built for myself in 308!
One of my Remington 700s. I changed the stock closed-bottom, top-loading magazine to a box-fed magazine. You can see the magazine and its release in front of the trigger guard. Of course I also replaced the stock with a snazzy sniper’s stock. And I replaced that cheesy ridiculously tiny stock bolt handle with an oversized one that is textured to make it super easy too manipulate with gloved hands.
Label 1
This is a Winchester “97” Take-down “Trench Gun” shotgun built in 1942 for use in WWII. When it came to me it was missing the take-down mechanism and the heat-shield, and the barrel and the stock had been cut off. The owner purchased it in that condition and brought it to me to be completely restored, including parkerizing, to its original condition. Here is the final product!
As Presented

In Progress

Finished Work
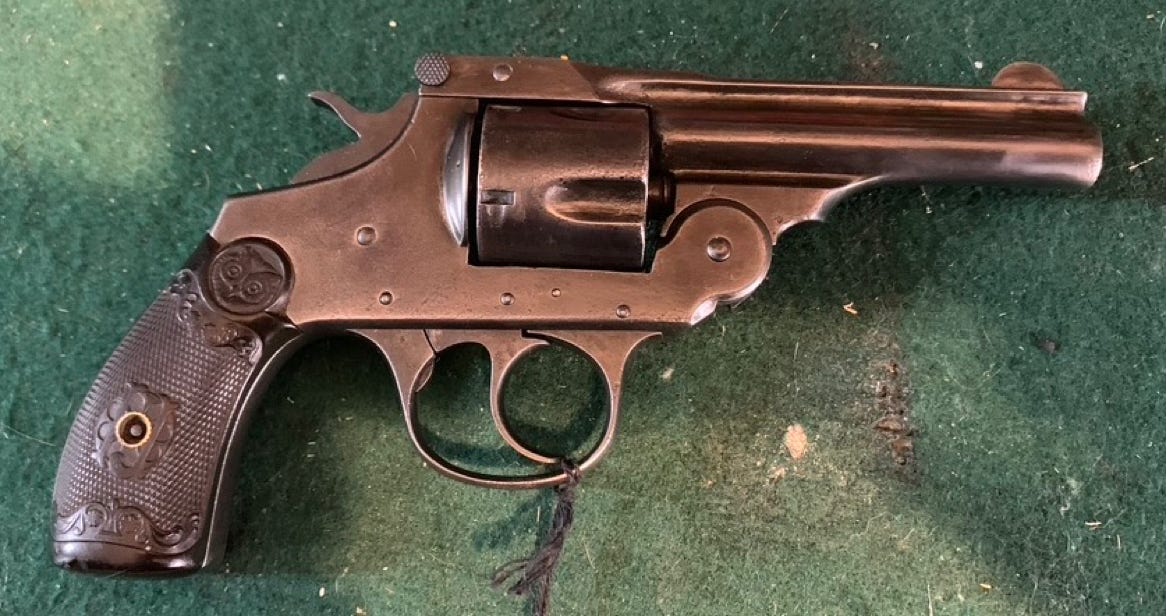
This is an OLLLLLLDDDDDDD Iver Johnson .38 a customer brought in. As you can see in the “before” picture above, the hard-chrome plating was severely damaged and had come off in many places. Where there was no chrome the bare metal was corroded and heavily pitted. I removed the remaining chrome plating and smoothed out as much of the pitting as possible before completing a final polish. Then I cold-blued the firearm. The “shiny” spot under the end of the barrel is a selection and not a light spot in the finish!


